How to Use Your Journal to Plan for a Great Semester
A fool-proof way to organize all of your assignments
Hey there! Its Lydia.
Are you a new or returning college student who is sick of forgetting about your assignments? Or maybe you are just looking for a new way to stay extra organized? Either way, this creative way of organizing your semester is definitely for you. And a major plus- it can match your bullet journal theme!
I have been using this method of planning and tracking my assignments ever since my first summer session, and let me tell you- it is very handy. I have experimented with different layouts and different ways to write it all out, but I have always kept one thing in common: the assignments! I recommend planning only for a month in advance, but it is all up to you! I say this because I make my bullet journal spreads monthly, and the assignment tracker just fits in so nicely that way.
Supplies needed:
A journal/planner with extra pages
An pencil and eraser
Colorful pens and markers of choice
Black pen
Class syllabus
Loose leaf paper
Step 1: Organize your Assignments
The most important step in this whole process is organizing. You need to know what your assignments are before you start to plan!
The first thing you must do is look at your class syllabus, and there should be a section telling you all the assignments and tests and such. From there, you will copy the assignments down by week (leaving space for each class). Next, go to your other classes syllabi and copy it down by week using the same method.
I recommend keeping this piece of paper for future reference incase you need it again for next months assignments
Step 2: Fitting it in
Now this step is where the pencil and eraser really come in handy. According to your assignments and course load, you should now map out your page. Decide if you want columns, rows, or boxes.
I like to do my layout weekly (week 1, week 2…). This just helps me to know how far into the semester I am! I do either one page per week or two pages per week, depending on how many assignments I have.
One page per week
Here is one of my examples of using one page per week. For this spread, I only had two courses to split it up by.
You may need to put all of your weeks in the back pages if you are using a pre-made planner, because that is the only place with free pages. If you are using a bullet journal, you can keep your assignment tracker at the beginning or end of your month, or in between weeks… its all up to your preference.
Step 3: Writing it Down
This is where you get to start actually writing! I normally start by putting the header. I like the just head the page with “WEEK 1” or “WEEK 2” and so on. Depending on how you decided to map out your pages, you should sub-head each row/column/box with your course name.
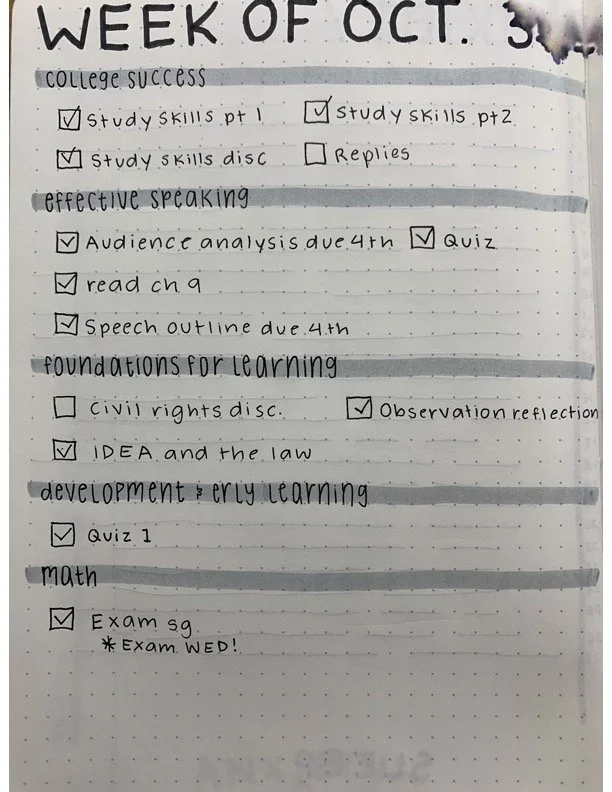
Here is an example of my sub headings when using rows to separate my classes (yes, I spelled “early” wrong).
Under the course name, you can start writing down the assignments and tests. If they are all due on different days, you should definitely write down the due date next to them. For a lot of my classes the assignments are due on Sundays, so I just write big at the top of the page/class “DUE SUNDAY”. It all depends on your schedule
If you did this step in pencil, you can either decide to go over it in pen now, or wait until you have mapped out your art and color scheme.
Step 4: Get Creative!
Here is where you get to use your creativity! If you are doing this in your bullet journal, this is a perfect opportunity to carry over your monthly them/color scheme.
With whatever leftover space you have left on the page, you can make some doodles or draw whatever theme the rest of your pages have. You can also keep it minimalistic, or let the colors be the design. If you do not have a theme or color scheme, just draw whatever you would like!
As you can see here, I used my floral theme and color scheme on this page.
Quick tip- Use colored markers to highlight the important aspects and make them POP!
Step 5: Put it to Use
Congratulations! You now have an interactive semester assignment tracker.
Use it throughout the semester to keep you organized. And if you like it, you can make a new one next month!
Pictured above are my progression pictures. I find it interesting how I went from simply writing down my assignments to making a full on spread!
Thanks for trying my layout idea! I would truly love to see how your’s turned out. Leave a comment or email showing me! Also, add me on pinterest and instagram for more ideas.
Until next time,


